
Automating Home Assistant Configuration to GitHub
Being a newbie to Home Assistant, I wanted to automate the changes to the configuration files/folder by pushing these backups to a private GitHub repository. This approach helps avoid exposing any secrets or API tokens and ensures that I can restore contents when required due to any failures of the Home Assistant instance.
While many articles cover this topic, I want to capture all the steps comprehensively without neglecting any detail. Here is a step-by-step guide to setting up this automation:
Install Advanced SSH & Web Terminal Addon. Home Assistant Community Add-on: Advanced SSH & Web Terminal
Create the .gitignore file in the terminal by using the following command. Include the needed lines of code in the .gitignore for excluding it from committing.
nano .gitignore
- Initial git commands and changing master to main branch for keeping the GitHub naming convention for branches.
git init
# add all files to repository by using .
git add .
# By default the HA terminal will create master branch which can be updated to main with the following command. type git branch -m master main
➜  /config git:(master) ✗ git branch -m master main
# now branch is updated commond line will display follows
➜  /config git:(main) ✗
- Create .ssh directory to store SSH key passphrases. More reading
# create a directory named as .ssh by using mkdir command
➜ mkdir .ssh
# enter the following line of command ssh-keygen -t rsa -b 4096 -C “myemail@gmail.com”
➜ ssh-keygen -t rsa -b 4096 -C “akbarsaitn.cfmx@gmail.com”
# Enter the file name as .ssh/id_rsa to save the key and enter twice for creating empty password. It will display the following confirmations.
Enter file in which to save the key (/root/.ssh/id_rsa): .ssh/id_rsa
Enter passphrase (empty for no passphrase):
Enter same passphrase again:
Your identification has been saved in .ssh/id_rsa
Your public key has been saved in .ssh/id_rsa.pub
Copy and add the SSH key generated from file “ssh/id_rsa.pub” to the “SSH and GPG Key” section in the github.com. https://github.com/settings/ssh/new
Enter the following command to target and inform where the newly generated id_rsa file.
➜ git config core.sshCommand "ssh -i /config/.ssh/id_rsa -F /dev/null"
- Now enter the following commands. You will obtain these lines of code when the creating your free GitHub repository. Remember to use SSH mode, not HTTPS version of the remote URL.
➜  git remote add origin git@github.com:Akbarsait/mygitreponame.git
➜  git push -u origin main
If incase you set remote URL incorrectly, follow this command to update it.
➜ git remote set-url origin git@github.com:Akbarsait/mygitreponame.git
- Create a Shell script “backup2git.sh” with the following git commands to handle adding and committing files to repository.
# get the HA version and set ha version, current date and custom message.
HA_VERSION=`cat .HA_VERSION`
COMMIT_DATE=$(date +'%d-%m-%Y %H:%M:%S')
COMMIT_MESSAGE="Autocommit from HA - [$HA_VERSION]: $COMMIT_DATE"

echo "$COMMIT_MESSAGE"

git add .
git commit -m "$COMMIT_MESSAGE"
git push
- Provide executable access to the file and Check by manually running it. This manual execution is happening at the “Advanced SSH & Web Terminal” docker container not to the actual Home Assistant container.
# setting execute permission to the file
➜ chmod +x backup2github.sh
# run the file to view results and correct any erros.
➜ ./backup2github.sh
To validate how it runs on the Home Assistant container utilizes the following command. Further reading on how to handle Shell command through SSH. SSH’ing from a command line sensor or shell command
# run the following command
➜ docker exec -it homeassistant bash
# will display the prompt as follows
homeassistant:/config#
# now run the following command.
➜ ./backup2github.sh
The SSH terminal will display the following message. Type “yes” to add github.com as a known host. This will allow in executing the script through the automation.

- Include the following lines of code to the configuration.yaml file.
shell_command:
  run_gitbackup: bash ./backup2github.sh
- Create an Automation that runs on a specific time internal by calling the above shell script as a service.
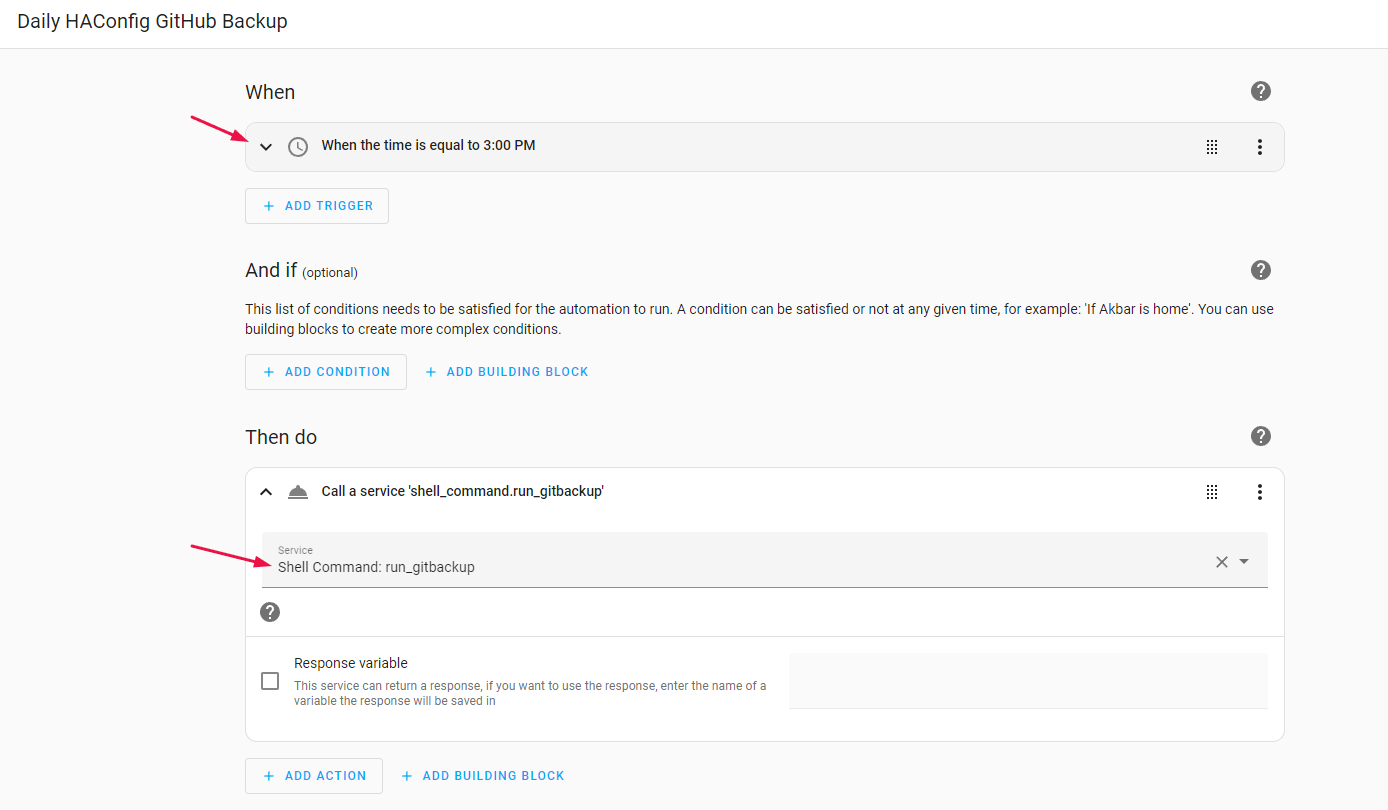
The code of the automation viewed by checking in the ‘Edit in YAML’ option.
alias: Daily HAConfig GitHub Backup
description: ""
trigger:
  - platform: time
    at: "15:00:00"
action:
  - service: shell_command.run_gitbackup
    data: {}
By following these steps, you can ensure that your Home Assistant configuration is regularly backed up to a private GitHub repository. This setup will provide peace of mind knowing that you can restore your configuration in the event of any failures.
Related Link:
Feel free to reach out with any questions or comments. Happy automating!
